GlobalSign Adobe Air Code Signing Certficate Renewal Installation Update 2015

April 7, 2015

Downloaded Adobe Air Code Signing Certificate per the usual process

  1. I was asked for my pickup password which I had selected in the application process
  2. A new view appeared requesting I create a password for the certificate being issued
  3. The password had to be a minimum of 12 characters
  4. Then a view appeared requesting that I download my certificate

downloadCertificate
This year GlobalSign recommended selecting the sha256 hash algorithm rather than the old sha1 which is the only difference I noted during the download process from last year.

PFX Downloaded File
The pfx file which is downloaded can be used directly as a code signing certificate file when creating an adobe air program via flex or flash.

Install Code Signing Certificate in Windows
To backup the certificate, I was under the impression I had to import the certificate into a browser like Firefox or Internet Explorer. BROWSER INSTALLATION PROCESS NOT NECESSARY!!

I can install the code signing certificate in Windows by double clicking on the pfx file directly and windows comes up with a wizard that steps you through the installation process without using any browsers. Per the image below, I made sure to check “Mark this key as exportable” and enter the certificate password:
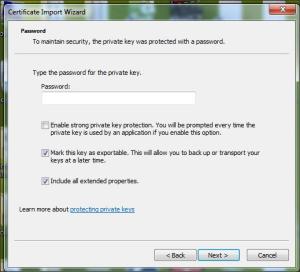
certImportWizardChecks

Once installed in the windows store you can bring up the certificate in IE or Chrome and export it and create a backup copy (See next section).

(Noto Bene – If you do use a browser to install the certificate, the phone support person recommended chrome or Internet Explorer due to the fact that firefox uses a special certificate store scenario.)

Export Certificate
Export Code Signing Certificate Instructions

PFX VS p12
pfx is the microsoft extension
p12 is the netscape extension


is not commonly downloaded and could be dangerous Message

January 6, 2015

We have an adobe air application which has a code signing certificate included during creation of the package. I added another layer by creating a windows installer(via Inno Setup) then using microsoft signtool to pass on the code signing certificate. I recently tried to download the file via Chrome and the message:

<file> is not commonly downloaded and could be dangerous

was displayed along the lines of the image below:
discardImage

I did a quick google and found the following message on an adobe forum. The user recommended the DigiCert Certificate Utility which is available here.

I took my exe file and applied the adobe code signing certificate to this windows installer wrapped package using the Certificate Utility. Voila! The error message was no longer occurring when downloading via Chrome.


RichEditableText textFlow attribute not updating properly

April 28, 2014

Was having an issue with the RET component as described in the adobe form:
textFlow (RichEditableText) not updating properly

I had created a popup window to display Bibliography references and it was not always updating when new text was injected into the textflow attribute. The view would refresh if I clicked on the text area. Based on the information in the adobe forum, I changed the initial component implementation:

<s:RichEditableText id="biblioInfo"
						textFlow="{TextConverter.importToFlow(pageInfo, TextConverter.TEXT_FIELD_HTML_FORMAT)}"
						width="100%"
						paragraphStartIndent="10"
						paragraphEndIndent="10"
						editable="false"
						selectable="true"
						/>

to the following:

<s:RichEditableText id="biblioInfo"
						textFlow="{updateFlow(pageInfo)}"
						width="100%"
						paragraphStartIndent="10"
						paragraphEndIndent="10"
						editable="false"
						selectable="true"/>

Where updateFlow was a function which was defined in the script section of the mxml file in the following manner:

private function updateFlow(clip:String):TextFlow {
				
		if (this.biblioInfo){
			this.biblioInfo.textFlow = null;
			this.biblioInfo.validateNow();
		}
				
		//  Converts html text into a TextFlow
		var flow:TextFlow = TextConverter.importToFlow(clip, TextConverter.TEXT_FIELD_HTML_FORMAT);
				
		return flow;
	}

I found this approach solved the refresh problem for my RichEditableText component.


Flash Player Debugger 13 Installation Process

April 15, 2014

I did the following to successfully install the flash player debugger for Flash Builder 4.7:

  1. Uninstalled flash player on windows using the directions here
  2. Went to adobe debugger downloads site and downloaded plugins and standalone projectors
  3. Manually transferred the standalone debugger exes into flash CS6 and flashbuilder 4.7 directory locations
  4. Went to the flash builder project output folder and associated the swf files with the debug flash player

Step 3
Located the flash builder 4.7 player directory which is installed at the following location on my machine:
C:\Program Files\Adobe\Adobe Flash Builder 4.7 (64 Bit)\player\win\13.0

Copied the downloaded flash player plugins for version 13.0 and also the debugger standalone projector to this location

Located the flash professional CS6 debugger player directory which is installed at the following location on my machine:
C:\Program Files (x86)\Adobe\Adobe Flash CS6\Players\Debug

Copied the downloaded flash player debugger standalone projector to this location

Copied the downloaded flash player standalone projector to this location:

C:\Program Files (x86)\Adobe\Adobe Flash CS6\Players

Step 4
Finally had to manually associate flash builder generated swf file with the latest debugger player by doing the following:

  1. Select a swf file
  2. Right click and choose Open With
  3. Browse to the C:\Program Files\Adobe\Adobe Flash Builder 4.7 (64 Bit)\player\win\13.0 directory
  4. Select FlashPlayerDebugger.exe

After that, any error message that Flash builder can not find the debugger version of the flash player should be gone.


Flashbuilder 4.6 to 4.7 HTML Wrapper – playerProductInstall vs expressInstall

April 8, 2014

We had created a custom template file called ${application}${build_suffix}.template.php (instead of html template) which we used to autogenerate our output webpage.

When I upgraded from Flashbuilder 4.6 to Flashbuilder 4.7. I noticed that the xiSwfUrlStr substitution value changed from playerProductInstall to expressInstall.

Template line was:
var xiSwfUrlStr = “${expressInstallSwf}”;

Output from 4.6
php file contained line:
var xiSwfUrlStr = “playerProductInstall.swf”;
Flashbuilder also output to bin directory:
playerProductInstall.swf

Output from 4.7
php file contained line:
var xiSwfUrlStr = “expressInstallSwf”;
Flashbuilder also output to bin directory:
expressInstall.swf

Flashbuilder 4.6 has a page on html templates which discusses the substitution
http://help.adobe.com/en_US/flex/using/WS2db454920e96a9e51e63e3d11c0bf663fe-7fff.html#WS2db454920e96a9e51e63e3d11c0bf69084-7ba5

Here is mention of the change on the apache flex developement site:
http://apache-flex-development.2333347.n4.nabble.com/Flash-Builder-4-6-Apache-Flex-4-11-0-and-expressInstall-swf-td34125.html

Here is swfobject google code location:
https://code.google.com/p/swfobject/wiki/documentation

Otherwise I could not find a reference to this change on the adobe site.


GlobalSign Renewal

February 11, 2014

This year the global sign renewal process was straight forward. I received an email to install my certificate by clicking on a link in the email.

The GlobalSign website was rendered in my firefox browser and the following sequence ensued:

  1. I was asked for my certification installation password.
  2. A new view appeared requesting I create a password for the certificate being issued
  3. The password had to be a minimum of 12 characters
  4. Then a view appeared requesting that I download my certificate

Download Certificate View:

downloadCertificate
Continue reading


AS3 Textfield New Line not being Recognized

January 14, 2014

I loaded an xml file into a program which was then used to set string based variables. The text from the xml file was contained between CDATA tags and contained the \n character as shown below:

<![CDATA[Directions:\n1. Choose a patient by clicking on a silhouette.\n\n]]>

The AS3 textfield was not recognizing the new line character when set from the xml file and was just displaying the \n within the Textfield so it appeared in the textfield like this:

Directions:\n1. Choose a patient by clicking on a silhouette.\n\n

Finally found a solution from a post from 2008:

Newline characters not recognized when parsing external xml file

Once I added the code recommended on the site:

myText.replace(/\\n/g, "\n");

The new line was recognized in the textfield.

Reminder /g is a flag to globally replace all the occurrences.


Installing Microsoft signtool.exe on Windows 7- Part 2

November 19, 2013

I recently upgraded to a Windows 7 machine and needed to install the signtool on my new pc. This is a followup to the post Installing Microsoft signtool.exe posted in May 2012.

I searched the web for the download location for the Windows 7 version of the SDK and found this url: Windows SDK for Windows 7 and .NET Framework 4.

I downloaded the winsdk_web.exe file and tried to install a minimal version of the SDK since I only wanted the signtool.exe. I was not able to successfully install this version since I did not have the correct .NET version. I was getting the error message “Some components cannot be installed” message.

So instead of upgrading to .NET 4 version I returned to the previous download link and perused the archived versions. I found the download for the Windows SDK .NET Framework 3.5 SP1 archived version which is preinstalled on all Windows 7 machines. I downloaded the new winsdk.exe for this version.

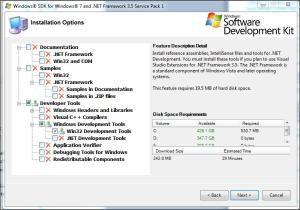
I selected the same settings as I did for Windows XP version:

Windows 7 SDK options Selected

Windows 7 SDK options Selected

This installation ran smoothly and in a similar manner to the one for windows XP.

I can now access the signtool on my new desktop with a minimal windows SDK installation.


Flashbuilder 4.7 and ASUS Nexus 7 Device Driver

November 8, 2013

I am currently doing development work on a Windows 7 Machine. Based on my previous XOOM device driver installation for flex, I started out by doing the following steps:

  1. Downloaded and installed Nexus 7 usb device driver
  2. Installed the USB device driver
  3. Enabled Nexus 7 Device to allow USB debugging

Nexus 7 Device Drivers
Googling brought up the following ASUS site where I downloaded the drivers:
http://www.asus.com/Tablets_Mobile/Nexus_7/#support

I selected the support link right above the device.
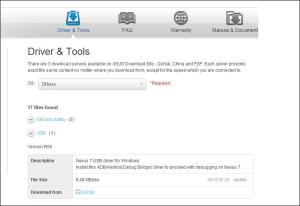
The new page came up with “FAQ” selected.
I then chose “Driver & Tools”.
The OS I selected was “Others”.
I then selected the USB driver for windows and downloaded it and extracted the files from the zip file.

Nexus Website Download

Nexus Website USB Driver Download

Installed USB Device Driver
I then proceeded to loosely follow the installation instructions for the Nexus device using the following link I found in the FAQ. http://www.asus.com/support/Knowledge-Detail/28/2/Nexus_7/D53452AE-143C-42F1-BDC1-7F168085F0D7/

Enabled USB Device Debugging Device Setting
I then went to the device settings on the Nexus 7. Selected App Development and selected enable usb debugging.

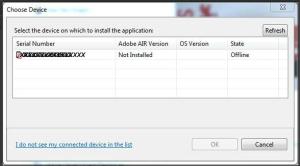
Finally I was ready to debug my code on the Device. I brought up Flashbuilder 4.7 and proceeded to run my app in debug mode on the device. ACK! – I got the message that my device was recognized but it was offline!

Adobe Air Not Installed and Device Offline

Adobe Air Not Installed and Device Offline

A quick google brought up the following links from Stack Overflow:

Sooo
I read the two answers and determined that I needed to download the latest SDK for Android which I found at SDK Download from Android Developer site

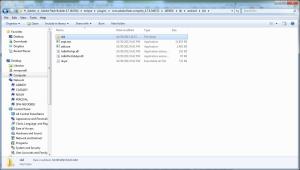
Followed the instructions to copy the files to the new directories (files to copy were not exactly the same but I also kept the old ones just in case)
nexusDriverUpdatesSdk

I brought up Flashbuilder 4.7 and proceeded to run my app in debug mode on the device. And Voila it recognized my device and I was on my merry way!

EXCEPT the next day I came back and tried to debug on the device but now no devices were listed in the Flashbuilder Dialog device listing box where you choose the device to run your code.

The NEXUS was being detected as a media device and apparently I needed to change the storage mode settings to make it a camera per this online posting http://android.stackexchange.com/questions/48309/how-do-i-get-my-nexus-7-to-show-up-in-the-adb-devices-list:

I discovered that it was necessary to change my USB transfer mode.

You can do this on the Nexus 7 by going to Settings > Storage, clicking on the strange menu icon in the top right hand corner and selecting “USB computer connection”. I then changed the storage mode to “Camera (PTP)”, and it immediately prompted me with the permission dialog as shown in your post above. I was then able to deploy apps, debug, etc and it all worked.

I don’t know what I would do without all the information sharing that the internet allows individuals to provide to one another!


Creating Flex Component View using Flash CS5

September 27, 2012

We created some Flex based component views using Flash CS5 by following the instructions in the Adobe Article Combining animation and ActionScript using Flash Professional CS5 and Flash Builder 4 which we used inside our course player. These View components had text fields which would dynamically resize when the player was resized on the fly(Only for firefox and safari, IE and chrome do not allow resizing). These views also had images which would scale appropriately as well.

Note this led to my series on embedding fonts due to conflict messages with respect to flex based textfield and flash based textfields(This is explained in detail in Part 3 of the series).